 ZryDys
Safe marine business, sail, kayak even in remote areas
This project aims at increasing safety of sailing and water sports even in remote communities.
What: Capture live Automatic Identification System (AIS) signals from vessels and display maritime traffic.
How: Building tiny systems at villages to track ships, based on affordable hardware and know-how. Circular reusing of simple devices.
Why: Many hours in sea rescue patrols, free kayaking initiatives, and apparently-calm waters led to helping non-profit for the sustainable and safe tourism & community use of water sports. Conscious about safety in rivers and sea for navigation, fishing, sports.
Where Suitable for sailing in coast or rivers and lakes (few small spots areas under consideration now).
Affordable Overall the project relies in using existing devices and know-how to support all in remote areas,
ONGOING Projects with SAR teams, NMEA VHF GMDD 2026 … want to join or collaborate?: 📞 Contact us: | ✉️ ZryDys@gmail | 🌐 ZryDys.github.IO
Mission: to bridge the tech gap using open-source tools, training, and low-cost innovation — so even small associations or villages can benefit from solutions once reserved for corporations.
Examples of affordable solutions: adding demo or redundancy:
- Instead of €900 GPS investment we build €90 simple locations, (less precise than commercial yet 9 times its price) zrydys.github.io/gps.html
- Small sets democratize usage and allow faster reusing of existing elements
- Replace $1000 marine tools by $150 DIY kits. simple green AIS (ais = zrydys.github.io/ais.html)
Promoting circular economy solutions where we can share, reuse, repair, refurbish existing devices. (contributing also to diminish pollution on disposal of old cellular or laptops)

-
In addition to AIS Navigation, Zrydys.github.io´s interest covers also oceanographic, meteorological, and environmental data transmission.
-
next tech references will be added below: #ais #gps #raspb #pi
Technical AIS GPS PI references below
The great navigation community referred below brought these guides for safest sailing !
Feel free to follow or visit the original authors or papers referred here:
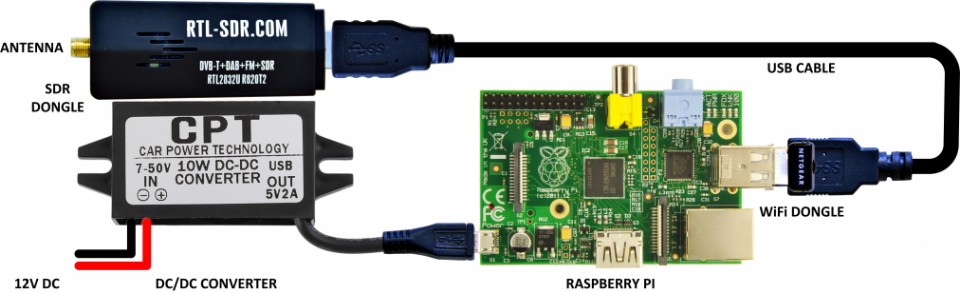
Building a Raspberry Pi Based AIS Receiver with an RTL-SDR, Preamp and Collinear Antenna
Thank you to SARCNET (School Amateur Radio Club Network) for submitting news about their tutorial on building a Raspberry Pi and RTL-SDR based AIS receiver. In their tutorial they show what equipment is required and provide access to a ready to use SD Card image for the Pi that has the AIS software pre-installed and ready go. They also show how to upload data to various online AIS data aggregators like AISHub and MarineTraffic.
AIS stands for Automatic Identification System and is used by ships to broadcast their GPS locations in order to help avoid collisions and aide with rescues. An RTL-SDR with the right software can be used to receive and decode these signals, and plot ship positions on a map.
The School Amateur Radio Club Network publishes a simple project aimed at promoting the deployment of maritime Automatic Information System (AIS) receiving stations around the world using cheap RTL-SDR dongles and Raspberry Pi computers. The purpose of the project is to improve the existing terrestrial AIS receiving network by encouraging enthusiasts to setup their own AIS receiving stations and to disseminate their local vessel traffic data freely to AIS Servers. This data can then be used by many organisations involved in monitoring and improving the safety and security of shipping.
The SARCNET project, which works on all models of Raspberry Pi, makes building the AIS receiving station simple by providing pictorial construction details with a pre-packaged Raspberry Pi image to download. The free project uses open-source software and a bootable Raspberry Pi image which has been updated to use the latest Raspbian Lite operating system.
One of the attractions of building your own AIS receiving station is that some AIS servers reward you when you freely upload your local vessel tracking data. They publish your station information, showing your station position on a map and your receiving statistics like messages per hour and coverage in nautical miles. Some give you free, premium access to their AIS data, which can be viewed on their mobile apps. Even so, by operating one of these AIS receiving stations, you will have the satisfaction of making the world a safer place.
Related Sources and posts:
- src: https://somesquares.org/blog/2017/10/GPS-AIS-server/ integrate an AIS receiver to OpenCPN with a raspberry Pi. (The kplex sending both inputs on UDP broadcast relate to the experience onboard oceanographic Hesperides on Woce surveys -cj)
- src: rtl-sdr from https://www.rtl-sdr.com/building-a-raspberry-pi-based-ais-receiver-with-an-rtl-sdr-preamp-and-collinear-antenna/
- FlightBox: Commercial RTL-SDR Based ADS-B (1090ES & 978UAT) Receiver for Pilots
- RadarBox24 Release their XRange RTL-SDR ADS-B Receiver
- Setting up a Raspberry Pi Based AIS Receiver with an RTL-SDR
- Element14 Video on Setting up a Portable Raspberry Pi & RTL-SDR Based NOAA Weather Satellite Receiver
- YouTube Tutorial: Software Set up for a Portable Raspberry Pi and RTL-SDR Based NOAA Weather Satellite Receiver
Serving GPS and AIS data from Raspberry Pi + WiFi
Src: 2017 https://www.tindie.com/products/astuder/daisy-hat-ais-receiver-for-raspberry-pi/
This is the second entry in a series about using a Raspberry Pi as the hub of my boat’s data network. Today I describe how I integrated an ultra cheap USB GPS device ($8 on eBay) and an inexpensive AIS receiver (the dAISy Hat, $65 on Tindie. The AIS receiver tells me the locations of all ships within VHF range (at least five miles), while the GPS gives me my location and the current time to within a fraction of a second.
Lot of people have written about using a GPS to configure their network time server within a few microseconds, but those tutorial always assume an expensive GPS device that breaks out a PPS (pulse per second) signal. PPS bypasses the small delays in USB communication, which is necessary to get more accurate time than what you can get from Internet time servers. But I don’t need that much accuracy, I only want a time signal that is quite accurate and independent of an Internet connection (because the boat will sometimes be at sea).
Following up on 2017 turned my Raspberry Pi into a WiFi router. Next use this router to broadcast its GPS data and AIS targets to all connected devices.
Hardware
The dAISy Hat plugs directly into the Raspberry Pi but needs an external antenna. I had one from when I purchased an RTL-SDR device and you can (as of writing) buy that antenna for $10 from the RTL-SDR store. But ultimatly I intend to build a splitter that will allow me to share the masthead VHF antenna, which has much better line-of-sight.
The GPS device was just about the cheapest available on eBay when I bought it: eight dollars shipped, its totally generic and looks like a large flash drive.
Software
Interpreting the data stream from the GPS device is the job of gpsd. Install it as follows:
sudo apt-get install gpsd gpsd-clients
Running a time server from the Pi requires that you install ntp, so run the command
sudo apt-get install ntp ntpstat jq
As a server to broadcast data to other devices, I use kplex. My recommendation is that you download the source from the website and build it on your Pi, which only takes seconds and for me is a lot easier than trying to configure apt for non-standard package repositories.
Configuration
You want gpsd to run on startup, to provide a time output even without a current GPS fix, and to keep its connection to the GPS device alive even if no data arrives and no clients are connected. To do all this, add the following line to your /etc/rc.local file:
gpsd /dev/ttyACM0 -nrF /var/run/gpsd.sock
kplex needs start when the Pi boots up, which I do in my crontab via the @reset directive. Open your crontab with the command crontab -e, and add the line
@reboot sleep 15; kplex
Now configure kplex to know which inputs to listen for, and how to output them. You can create a kplex config file at ~/.kplex.conf and copy the following directly into it:
[global]
mode=background

[tcp]
direction=in
address=127.0.0.1
gpsd=yes
mode=client

[serial]
filename=/dev/serial0
baud=38400
direction=in

[udp]
device=wlan0
port=10110
type=broadcast
The dAISy Hat communicates over serial port /dev/serial0, using the general purpose IO (GPIO) pins. You must tell the Raspberry Pi that they are now a serial port by inputting these commands, copied from the dAISy Hat instructions:
wget https://github.com/itemir/rpi_boat_utils/raw/master/uart_control/uart_control chmod +x ./uart_control
sudo ./uart_control gpio
sudo reboot now
The TCP input is listening to gpsd. And both of these inputs are being broadcast over the WiFi device (wlan0) using the UDP protocol on port 10110.
UDP is better than TCP for our purposes because the connection does not require the both ends to keep it alive. If you’re using the GPS data through kplex as input to OpenCPN on your laptop, as I am, then a TCP connection will stop working when your laptop goes to sleep or you restart it, and the connection won’t be automatically restored. But UDP will broadcast as long as the Raspberry Pi is powered up, and your laptop can start listening any time.
Set up the time server
As a time server, your Raspberry Pi should prefer to set its time from Internet time servers but should fall back to the GPS if you’re disconnected from the Internet. Use sudo nano /etc/ntp.conf to open the time server config file and add the following lines:
# Undisciplined Local Clock. This is a fake driver intended for backup
# and when no outside source of synchronized time is available.
server  127.127.1.0     # local clock
fudge   127.127.1.0 stratum 14


# If you want to provide time to your local subnet, change the next line.
# (Again, the address is an example only.)
broadcast 192.168.1.255
Adding the Pi’s own clock as a server makes it accessible, but labeling it stratum 14 makes it the lowest-possible priority time server. As a result, any other accessible server will have priority.
Now we need use the GPS to set the local clock. This is why we previously installed ntpstat and jq. We’ll create a script that checks the status of the internal clock. If it is unsynchronized or synchronized to stratum 15, then we will read the GPS time and write it to the Pi’s internal clock. First, run touch ~/sync-gps-time.sh and chmod +x ~/sync-gps-time.sh at the command line to create an executable script. Then copy the following code into ~/sync-gps-time.sh:
#! /bin/bash
if ( ntpstat | grep "unsynchronised" ) || ( ntpstat | grep "stratum 15" ); then

  gpspipe -w | jq -r --unbuffered "select(.time).time" | while read timestamp
    do
      date -s $timestamp
      break
    done
fi
As a final step, you need the script to run every 20 minutes as root in order to keep the internal clock synchronized. To do this, edit the root crontab by running the command sudo crontab -e and adding the following line to the file (be sure to change pi if you’re under a different username):
*/20 * * * * /home/pi/sync-gps-time.sh
OpenCPN Receiving the GPS and AIS data from Pi
When using OpenCPN for navigation, the GPS and AIS data to plot position and location signals of nearby ships can be imported:
- click the wrench icon to open the settings dialog, and
- go to the “Connections” tab.
- At the bottom click “Add Connection”, and then set the following settings:
-
Type: Network Protocol: UDP Address: the IP of your Pi’s wlan0 Port: 10110 - Click ‘OK’ and you should have a good, reliable, feed of GPS and AIS data!
Hubs
Then consider uppload AIS data to some like the https://www.aishub.net/
Tx
Best AIS-tx if transmission to the 87B and 88B channels restricted to FCC approved equipment?
SAR GMDSS
Global Maritime Distress & Safety System ( navcen.uscg.gov/?pageName=gmdssFaq ) by the International Maritime Organization (IMO.org UN ![]() )
)
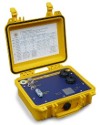
Commercial priv References: ST162-T1 Portable, Rugged AIS Test Set at (https://www.shinemicro.com/product/st162-t1/)
detail on the format for US MMSI numbers on navcen.uscg.gov/maritime-mobile-service-identity (by USCG 
One MMSI number is assigned for all applicable VHF electronics on the vessel, such as:
- AIS transponder
- DSC (Digital Selective Calling) Radio
- EPIRB (Emergency Position Indicating Repeater Beacon)
- AIS MOB (Man Over Board)